
搜索到
162
篇与
的结果
-

-
【PHP】PHP实现协同推荐算法 概述: 因为最近对算法这块进行了学习,所以最近对类似淘宝商品推荐的协同推荐算法进行了整理总结,本文将用php语言进行实现,文章将从以下几点进行终结: (1)什么是协同推荐算法?有什么用? (2)依据什么数学方法公式,为什么要用它? (3)实现流程是怎样的? (4)具体实现步骤。 首先,第一点,我们要实现一个算法必须要知道它有什么用,核心思想是什么?顾名思义,它的用途就是用来给我们做一些相似性推荐,推荐你喜欢的恭喜,根据你的好友等预测你喜欢的然后再推荐给你;我们举个例子来概括一下算法的核心思想:该算法的核心思想可以概括为:若a,b喜欢同一系列的物品(暂时称b是a的邻居吧),则a很可能喜欢b喜欢的其他物品。算法的实现流程可以简单概括为:1.确定a有哪些邻居 2.通过邻居来预测a可能会喜欢哪种物品 3.将a可能喜欢的物品推荐给a。 现在我们了解了这个核心思想以后,我们知道算法的核心是数学逻辑,我们必须理解其数学思想,然后再转化为编程思想达到我们的目标: 我们先回忆一下余弦定理: 可见cosA的夹角越小cosA的值越大,则边c和边b的长度越相近,因此我们利用余弦定理的向量方式类推出如下公式:1.余弦相似度(求邻居):2.预测公式(预测a可能会喜欢哪种物品): 接下来我们介绍一下实现流程: 现在我们具体看看怎样用php实现这个算法: (1)数据准备:在这里我们直接定义一组数据$userarray= [ ['name'=>'A','a'=>3,'b'=>2,'c'=>1,'d'=>5,'e'=>null,'f'=>null,'g'=>null], ['name'=>'B','a'=>1,'b'=>6,'c'=>6,'d'=>5,'e'=>2,'f'=>3,'g'=>5], ['name'=>'C','a'=>3,'b'=>5,'c'=>null,'d'=>4,'e'=>3,'f'=>3,'g'=>6], ['name'=>'D','a'=>4,'b'=>1,'c'=>1,'d'=>5,'e'=>3,'f'=>3,'g'=>3], ['name'=>'E','a'=>5,'b'=>1,'c'=>null,'d'=>4,'e'=>5,'f'=>1,'g'=>5], ['name'=>'F','a'=>1,'b'=>3,'c'=>2,'d'=>5,'e'=>6,'f'=>null,'g'=>4], ['name'=>'G','a'=>1,'b'=>5,'c'=>2,'d'=>5,'e'=>2,'f'=>3ll,'g'=>5] ]; (2)我们以A用户为对象分别计算出他们的余弦相似度,然后将其存入数组$cos中:/* * 以下示例只求A的推荐 */ $cos = []; $cos[0] = 0; $denominator_left = 0;//分母左边初始值 //开始计算cos //计算分母左边 for($i=1;$i<8;$i++){ if($userarray[0][$i] != null){//$userarray[0]代表A $denominator_left += $userarray[0][$i] * $userarray[0][$i]; } } $denominator_left = sqrt($denominator_left);//取算数平方根的值 for($i=1;$i<6;$i++){ $numerator = 0;//分子初始值 $denominator_right = 0;//分母右边初始值 for($j=1;$j<8;$j++){ //计算分子 if($userarray[0][$j] != null && $userarray[$i][$j] != null){ $numerator += $userarray[0][$j] * $userarray[$i][$j]; } //计算分母右边 if($userarray[$i][$j] != null){ $denominator_right += $userarray[$i][$j] * $userarray[$i][$j]; } } $denominator_right = sqrt($denominator_right ); $cos[$i]['cos'] = $numerator /$denominator_left /$denominator_right ;//存储当前用户的cos近似值 $cos[$i]['name'] = $userarray[$i]['name'];//存储当前用户的名字 $cos[$i]['e'] = $userarray[$i]['e'];//存储当前用户的e物品评分 $cos[$i]['f'] = $userarray[$i]['f'];//存储当前用户的f物品评分 $cos[$i]['g'] = $userarray[$i]['g'];//存储当前用户的g物品评分 }(3)我们对余弦近似值进行由大到小的排序,抽取前三个用户作为A用户的邻居,我们使用冒泡排序法对其进行排序// 第一层可以理解为从数组中键为0开始循环到最后一个 for ($i = 0; $i < count($cos) ; $i++) { // 第二层为从$i+1的地方循环到数组最后 for ($j = $i+1; $j < count($cos); $j++) { // 比较数组中两个相邻值的大小 if ($cos[$i]['cos'] < $cos[$j]['cos']) { $tem = $cos[$i]; // 这里临时变量,存贮$i的值 $cos[$i] = $cos[$j]; // 第一次更换位置 $cos[$j] = $tem; // 完成位置互换 } } } (4)接下来我们对A用户可能喜欢的物品进行预测,利用第二个公式,求出product值//计算A对e的评分 $numerator= 0;//分子初始值 $denominator= 0;//分母初始值 for($i=0;$i<3;$i++){ $numerator+= $cos[$i]['cos'] * $cos[$i]['e']; $denominator+= $cos[$i]['cos']; } $score_e = $numerator/sqrt($denominator); //计算A对f的评分 $numerator= 0;//分子初始值 $denominator= 0;//分母初始值 for($i=0;$i<3;$i++){ $numerator+= $cos[$i]['cos'] * $cos[$i]['f']; $denominator+= $cos[$i]['cos']; } $score_f= $numerator/sqrt($denominator); //计算A对g的评分 $numerator= 0;//分子初始值 $denominator= 0;//分母初始值 for($i=0;$i<3;$i++){ $numerator+= $cos[$i]['cos'] * $cos[$i]['g']; $denominator+= $cos[$i]['cos']; } $score_g= $numerator/sqrt($denominator);最后我们可以比较这些值,可以选取值最大的物品推荐给用户A
-
【PHP】PHP错误级别 在php编程过程中,大家一定会遇到或多或少的错误提醒,也正是这些错误提示,指引我们编写更加干净的代码,今天先写出我们主要列出的错误类型,先挖坑,写关于php错误与异常的相关知识,慢慢填坑。Deprecated最低级别错误,程序继续执行Notice 通知级别的错误 如直接使用未声明变量,程序继续执行 Warning 警告级别的错误,可能得不到想要的结果 Fatal error 致命级别错误致命级别错误,程序不往下执行 parse error 语法解析错误,最高级别错误,连其他错误信息也不呈现出来 E_USER_相关错误 用户设置的相关错误利用trigger_error()函数设置一个用户级别的 error/warning/notice 信息如何设置错误级别? error_reporting(-1)显示所有错误,error_reporting(0)屏蔽所有错误。ini_set('error_reporting',0)也是屏蔽所有错误。可以在php.ini文件中设置error_reporting来使脚本显示或不显示某些错误。ini_set('display_errors','On')显示错误。 注意:error_reporting()设置报告何种错误,而ini_set('display_errors','On')设置是否在输出错误。因而error_reporting(-1)和ini_set('display_errors',0)可用作设置日志:报告错误并且不输出。 举例:error_reporting(E_ALL&~E_NOTICE)不显示通知级别的错误。“~”表示非。
-
【PHP】PHPEmail的使用 第一步:使用composer安装phpmailercomposer require phpmailer/phpmailer第二步:common.php写个发送邮件的函数(腾讯邮箱的为例)/** * 系统邮件发送函数 * @param string $tomail 接收邮件者邮箱 * @param string $name 接收邮件者名称 * @param string $subject 邮件主题 * @param string $body 邮件内容 * @param string $attachment 附件列表 * @return boolean * @author static7 <static7@qq.com> */ function send_mail($tomail, $name, $subject = '', $body = '', $attachment = null) { $mail = new \PHPMailer(); //实例化PHPMailer对象 $mail->CharSet = 'UTF-8'; //设定邮件编码,默认ISO-8859-1,如果发中文此项必须设置,否则乱码 $mail->IsSMTP(); // 设定使用SMTP服务 $mail->SMTPDebug = 0; // SMTP调试功能 0=关闭 1 = 错误和消息 2 = 消息 $mail->SMTPAuth = true; // 启用 SMTP 验证功能 $mail->SMTPSecure = 'ssl'; // 使用安全协议 $mail->Host = "smtp.exmail.qq.com"; // SMTP 服务器 $mail->Port = 465; // SMTP服务器的端口号 $mail->Username = "static7@qq.com"; // SMTP服务器用户名 $mail->Password = ""; // SMTP服务器密码 $mail->SetFrom('static7@qq.com', 'static7'); $replyEmail = ''; //留空则为发件人EMAIL $replyName = ''; //回复名称(留空则为发件人名称) $mail->AddReplyTo($replyEmail, $replyName); $mail->Subject = $subject; $mail->MsgHTML($body); $mail->AddAddress($tomail, $name); if (is_array($attachment)) { // 添加附件 foreach ($attachment as $file) { is_file($file) && $mail->AddAttachment($file); } } return $mail->Send() ? true : $mail->ErrorInfo; }第三步:控制器方法里写发送的内容/** * tp5邮件 * @param * @author staitc7 <static7@qq.com> * @return mixed */ public function email() { $toemail='static7@qq.com'; $name='static7'; $subject='QQ邮件发送测试'; $content='恭喜你,邮件测试成功。'; dump(send_mail($toemail,$name,$subject,$content)); }第4步:测试发送请自行测试转发:https://www.thinkphp.cn/topic/44477.html
-
【设计模式】装饰器模式 使用场景: 当某一功能或方法draw,要满足不同的功能需求时,可以使用装饰器模式;实现方式:在方法的类中建addDecorator(添加装饰器),beforeDraw,afterDraw 3个新方法, 后2个分别放置在要修改的方法draw首尾.然后创建不同的装器类(其中要包含相同的,beforeDraw,afterDraw方法)能过addDecorator添加进去,然后在beforeDraw,afterDraw中循环处理,与观察者模式使用有点相似1.装饰器模式(Decorator),可以动态地添加修改类的功能2.一个类提供了一项功能,如果要在修改并添加额外的功能,传统的编程模式,需要写一个子类继承它,并重新实现类的方法3.使用装饰器模式,仅需在运行时添加一个装饰器对象即可实现,可以实现最大的灵活性DrawDecorator.php <?php namespace IMooc; interface DrawDecorator { function beforeDraw(); function afterDraw(); } Canvas.php<?php namespace IMooc; class Canvas { public $data; protected $decorators = array(); //Decorator function init($width = 20, $height = 10) { $data = array(); for($i = 0; $i < $height; $i++) { for($j = 0; $j < $width; $j++) { $data[$i][$j] = '*'; } } $this->data = $data; } function addDecorator(DrawDecorator $decorator) { $this->decorators[] = $decorator; } function beforeDraw() { foreach($this->decorators as $decorator) { $decorator->beforeDraw(); } } function afterDraw() { $decorators = array_reverse($this->decorators); foreach($decorators as $decorator) { $decorator->afterDraw(); } } function draw() { $this->beforeDraw(); foreach($this->data as $line) { foreach($line as $char) { echo $char; } echo "<br />\n"; } $this->afterDraw(); } function rect($a1, $a2, $b1, $b2) { foreach($this->data as $k1 => $line) { if ($k1 < $a1 or $k1 > $a2) continue; foreach($line as $k2 => $char) { if ($k2 < $b1 or $k2 > $b2) continue; $this->data[$k1][$k2] = ' '; } } } } ColorDrawDecorator.php<?php namespace IMooc; class ColorDrawDecorator implements DrawDecorator { protected $color; function __construct($color = 'red') { $this->color = $color; } function beforeDraw() { echo "<div style='color: {$this->color};'>"; } function afterDraw() { echo "</div>"; } } index.php<?php define('BASEDIR', __DIR__); include BASEDIR.'/IMooc/Loader.php'; spl_autoload_register('\\IMooc\\Loader::autoload'); $canvas = new IMooc\Canvas(); $canvas->init(); $canvas->addDecorator(new \IMooc\ColorDrawDecorator('green')); $canvas->rect(3,6,4,12); $canvas->draw();
-
【设计模式】策略模式 将一组特定的行为和算法封装成类,以适应某些特定的上下文环境。使用场景: 个人理解,策略模式是依赖注入,控制反转的基础例如:一个电商网站系统,针对男性女性用户要各自跳转到不同的商品类目,并且所有广告位展示不同的广告MaleUserStrategy.php<?php namespace IMooc; class MaleUserStrategy implements UserStrategy { function showAd() { echo "IPhone6"; } function showCategory() { echo "电子产品"; } } FemaleUserStrategy.php<?php namespace IMooc; class FemaleUserStrategy implements UserStrategy { function showAd() { echo "2014新款女装"; } function showCategory() { echo "女装"; } } UserStrategy.php<?php namespace IMooc; interface UserStrategy { function showAd(); function showCategory(); } <?php interface FlyBehavior{ public function fly(); } class FlyWithWings implements FlyBehavior{ public function fly(){ echo "Fly With Wings \n"; } } class FlyWithNo implements FlyBehavior{ public function fly(){ echo "Fly With No Wings \n"; } } class Duck{ private $_flyBehavior; public function performFly(){ $this->_flyBehavior->fly(); } public function setFlyBehavior(FlyBehavior $behavior){ $this->_flyBehavior = $behavior; } } class RubberDuck extends Duck{ } // Test Case $duck = new RubberDuck(); /* 想让鸭子用翅膀飞行 */ $duck->setFlyBehavior(new FlyWithWings()); $duck->performFly(); /* 想让鸭子不用翅膀飞行 */ $duck->setFlyBehavior(new FlyWithNo()); $duck->performFly();
-
【设计模式】适配器模式 将一个类的接口转换成客户希望的另一个接口,适配器模式使得原本的由于接口不兼容而不能一起工作的那些类可以一起工作。应用场景: 老代码接口不适应新的接口需求,或者代码很多很乱不便于继续修改,或者使用第三方类库。例如:php连接数据库的方法:mysql,,mysqli,pdo,可以用适配器统一//老的代码 class User { private $name; function __construct($name) { $this->name = $name; } public function getName() { return $this->name; } } //新代码,开放平台标准接口 interface UserInterface { function getUserName(); } class UserInfo implements UserInterface { protected $user; function __construct($user) { $this->user = $user; } public function getUserName() { return $this->user->getName(); } } $olduser = new User('张三'); echo $olduser->getName()."n"; $newuser = new UserInfo($olduser); echo $newuser->getUserName()."n";
-
【设计模式】观察者设计模式 观察者模式是挺常见的一种设计模式,使用得当会给程序带来非常大的便利,使用得不当,会给后来人一种难以维护的想法。使用场景: 用户登录,需要写日志,送积分,参与活动 等使用消息队列,把用户和日志,积分,活动之间解耦合什么是观察者模式? 一个对象通过提供方法允许另一个对象即观察者 注册自己)使本身变得可观察。当可观察的对象更改时,它会将消息发送到已注册的观察者。这些观察者使用该信息执行的操作与可观察的对象无关。结果是对象可以相互对话,而不必了解原因。观察者模式是一种事件系统,意味着这一模式允许某个类观察另一个类的状态,当被观察的类状态发生改变的时候,观察类可以收到通知并且做出相应的动作;观察者模式为您提供了避免组件之间紧密耦。看下面例子你就明白了!<?php /* 观察者接口 */ interface InterfaceObserver { function onListen($sender, $args); function getObserverName(); } // 可被观察者接口 interface InterfaceObservable { function addObserver($observer); function removeObserver($observer_name); } // 观察者抽象类 abstract class Observer implements InterfaceObserver { protected $observer_name; function getObserverName() { return $this->observer_name; } function onListen($sender, $args) { } } // 可被观察类 abstract class Observable implements InterfaceObservable { protected $observers = array(); public function addObserver($observer) { if ($observerinstanceofInterfaceObserver) { $this->observers[] = $observer; } } public function removeObserver($observer_name) { foreach ($this->observersas $index => $observer) { if ($observer->getObserverName() === $observer_name) { array_splice($this->observers, $index, 1); return; } } } } // 模拟一个可以被观察的类 class A extends Observable { public function addListener($listener) { foreach ($this->observersas $observer) { $observer->onListen($this, $listener); } } } // 模拟一个观察者类 class B extends Observer { protected $observer_name = 'B'; public function onListen($sender, $args) { var_dump($sender); echo "<br>"; var_dump($args); echo "<br>"; } } // 模拟另外一个观察者类 class C extends Observer { protected $observer_name = 'C'; public function onListen($sender, $args) { var_dump($sender); echo "<br>"; var_dump($args); echo "<br>"; } } $a = new A(); // 注入观察者 $a->addObserver(new B()); $a->addObserver(new C()); // 可以看到观察到的信息 $a->addListener('D'); // 移除观察者 $a->removeObserver('B'); // 打印的信息: // object(A)#1 (1) { ["observers":protected]=> array(2) { [0]=> object(B)#2 (1) { ["observer_name":protected]=> string(1) "B" } [1]=> object(C)#3 (1) { ["observer_name":protected]=> string(1) "C" } } } // string(1) "D" // object(A)#1 (1) { ["observers":protected]=> array(2) { [0]=> object(B)#2 (1) { ["observer_name":protected]=> string(1) "B" } [1]=> object(C)#3 (1) { ["observer_name":protected]=> string(1) "C" } } } // string(1) "D"
-
【设计模式】工厂设计模式 要是当操作类的参数变化时,只用改相应的工厂类就可以工厂设计模式常用于根据输入参数的不同或者应用程序配置的不同来创建一种专门用来实例化并返回其对应的类的实例。使用场景 :使用方法 new实例化类,每次实例化只需调用工厂类中的方法实例化即可。优点 :由于一个类可能会在很多地方被实例化。当类名或参数发生变化时,工厂模式可简单快捷的在工厂类下的方法中 一次性修改,避免了一个个的去修改实例化的对象。我们举例子,假设矩形、圆都有同样的一个方法,那么我们用基类提供的API来创建实例时,通过传参数来自动创建对应的类的实例,他们都有获取周长和面积的功能。例子<?php interface InterfaceShape { function getArea(); function getCircumference(); } /** * 矩形 */ class Rectangle implements InterfaceShape { private $width; private $height; public function __construct($width, $height) { $this->width = $width; $this->height = $height; } public function getArea() { return $this->width* $this->height; } public function getCircumference() { return 2 * $this->width + 2 * $this->height; } } /** * 圆形 */ class Circle implements InterfaceShape { private $radius; function __construct($radius) { $this->radius = $radius; } public function getArea() { return M_PI * pow($this->radius, 2); } public function getCircumference() { return 2 * M_PI * $this->radius; } } /** * 形状工厂类 */ class FactoryShape { public static function create() { switch (func_num_args()) { case1: return newCircle(func_get_arg(0)); case2: return newRectangle(func_get_arg(0), func_get_arg(1)); default: # code... break; } } } $rect =FactoryShape::create(5, 5); // object(Rectangle)#1 (2) { ["width":"Rectangle":private]=> int(5) ["height":"Rectangle":private]=> int(5) } var_dump($rect); echo "<br>"; // object(Circle)#2 (1) { ["radius":"Circle":private]=> int(4) } $circle =FactoryShape::create(4); var_dump($circle);
-
【设计模式】单例设计模式(Singleton) 所谓单例模式,即在应用程序中最多只有该类的一个实例存在,一旦创建,就会一直存在于内存中!应用场景: 单例设计模式常应用于数据库类设计,采用单例模式,只连接一次数据库,防止打开多个数据库连接。一个单例类应具备以下特点: 单例类不能直接实例化创建,而是只能由类本身实例化。因此,要获得这样的限制效果,构造函数必须标记为private,从而防止类被实例化。需要一个私有静态成员变量来保存类实例和公开一个能访问到实例的公开静态方法。在PHP中,为了防止他人对单例类实例克隆,通常还为其提供一个空的私有__clone()方法。单例模式的例子:<?php /** * Singleton of Database */ class Database { // We need a static private variable to store a Database instance. privatestatic $instance; // Mark as private to prevent it from being instanced. private function__construct() { // Do nothing. } private function__clone() { // Do nothing. } public static function getInstance() { if (!(self::$instance instanceof self)) { self::$instance = new self(); } return self::$instance; } } $a =Database::getInstance(); $b =Database::getInstance(); // true var_dump($a === $b);
-
-
【PHP】PHP报错ssl3_get_server_certificate:certificate verify failed问题 getimagesize(): SSL operation failed with code 1. OpenSSL Error message:error14090086:SSL routines:ssl3_get_server_certificate:certificate verify failed提示缺少证书,搜到很多帖子写的感觉不是很清楚,以下步骤我自己记录一下先下载cacert.pem证书, https://curl.se/ca/cacert.pem,下载完后我直接上传到了/www/server/php目录下找到对应的php版本的php.ini文件将openssl.cafile其路径替换为openssl.cafile=/www/server/php/cacert.pem也就是你刚把cacert.pem证书上传的路径最后重启php服务即可
-
【PHP】PHP获取开始时间结束时间方法总汇 <?php /** * @author yfl QQ554665488 * demo Time funtion */ //返回今天的开始时间和结束时间 function day_now() { $arr = [ mktime(0, 0, 0, date('m'), date('d'), date('Y')), mktime(23, 59, 59, date('m'), date('d'), date('Y')), ]; return $arr; } //返回昨天开始结束时间 改造上边的方法 function day_yesterday() { $yesterday = date('d') - 1; $arr = [ mktime(0, 0, 0, date('m'), $yesterday, date('Y')), mktime(23, 59, 59, date('m'), $yesterday, date('Y')), ]; return $arr; } //获取当前时间的本周开始结束时间 function week_now() { $arr = [ strtotime(date('Y-m-d', strtotime("-1 week Monday", time()))), strtotime(date('Y-m-d', strtotime("+0 week Sunday", time()))) - 1 ]; return $arr; } // var_dump(week_now()); // echo date('Y-m-d',strtotime('next Monday',time())); //返回上周开始和结束的时间戳 function last_week() { // 1520179200 1520783999 $arr = [ // date('Y-m-d',strtotime('last week Monday',time())), // date('Y-m-d',strtotime('last week Sunday',time())) strtotime('last week Monday', time()), strtotime('last week Sunday +1 days -1 seconds', time()) ]; return $arr; } // var_dump(last_week()); // 返回本月开始和结束的时间戳 function now_month() { $arr = [ mktime(0, 0, 0, date('m'), 1, date('Y')), mktime(23, 59, 59, date('m'), date('t'), date('Y')) ]; return $arr; } // var_dump(now_month()); // 返回某一年某一月的开始和结束的时间戳 function month_year($year, $month) { return [ $begin = mktime(0, 0, 0, $month, 1, $year), $end = mktime(23, 59, 59, $month, date('t', $begin), $year) ]; } // var_dump(month_year(2017,3)); // 返回当前季度的开始时间和结束时间 function now_quarter($month = 0) { $month = $month != 0 ? $month : date('n'); $season = ceil($month / 3); return [ mktime(0, 0, 0, ($season - 1) * 3 + 1, 1, date('Y')), mktime(0, 0, 0, $season * 3, date('t'), date('Y')) - 1 ]; } // var_dump(now_quarter()); // 返回上个月开始和结束的时间戳 function lastMonth() { $begin = mktime(0, 0, 0, date('m') - 1, 1, date('Y')); $end = mktime(23, 59, 59, date('m') - 1, date('t', $begin), date('Y')); return [$begin, $end]; } // var_dump(lastMonth());
-
【PHP】TP6.0验证码接口 安装验证码扩展:composer require topthink/think-captcha创建验证码接口: public function setYzm(){ $captcha_img = Captcha_src(); $src = $_SERVER['REQUEST_SCHEME'].'://'.$_SERVER['SERVER_NAME'].'/api'.captcha_src(); ob_clean(); //清除缓冲区,防止出现“图像因其本身有错无法显示'的问题 $type = getimagesize($src)['mime']; //获取图片类型 header("Content-Type:{$type}"); $imgData = file_get_contents($src); //获取图片二进制流 $base64String = 'data:' . $type . ';base64,' . base64_encode($imgData); return show(200,'请求成功',$base64String); } 可以不用base64处理直接返回验证码地址 public function checkYzm($yzm){ if(!Captcha::checkApi($yzm)) throw new Exception('验证码验证失败~'); return true; }修改底层配置路径:vendor/topthink/think-captcha/src/Captcha.php/** * 创建验证码 * @return array * @throws Exception */ protected function generate(): array { $bag = ''; if ($this->math) { $this->useZh = false; $this->length = 5; $x = random_int(10, 30); $y = random_int(1, 9); $bag = "{$x} + {$y} = "; $key = $x + $y; $key .= ''; } else { if ($this->useZh) { $characters = preg_split('/(?<!^)(?!$)/u', $this->zhSet); } else { $characters = str_split($this->codeSet); } for ($i = 0; $i < $this->length; $i++) { $bag .= $characters[rand(0, count($characters) - 1)]; } $key = mb_strtolower($bag, 'UTF-8'); } $hash = password_hash($key, PASSWORD_BCRYPT, ['cost' => 10]); $this->session->set('captcha', [ 'key' => $hash, ]); //加上这行代码,便于后续校验验证码 if(empty(cache($key))){ cache($key, $hash, 5*60); }else{ return $this->generate(); } //加上这行代码,便于后续校验验证码 return [ 'value' => $bag, 'key' => $hash, ]; } /** * 验证验证码是否正确 * @access public * @param string $code 用户验证码 * @return bool 用户验证码是否正确 */ public function checkApi(string $code): bool { if (!cache($code)) { return false; } $key = cache($code); $code = mb_strtolower($code, 'UTF-8'); $res = password_verify($code, $key); if ($res) { cache($code,NULL); } return $res; }
-
【PHP】删除数组指定的键 /** * php除数组指定的key值(直接删除key值实现) * @param unknown $data * @param unknown $key * @return unknown */ function array_remove($data, $key){ if(!array_key_exists($key, $data)){ return $data; } $keys = array_keys($data); $index = array_search($key, $keys); if($index !== FALSE){ array_splice($data, $index, 1); } return $data; } /** * php除数组指定的key值(通过直接重新组装一个数组) * @param unknown $data * @param unknown $key * @return unknown */ function array_remove1($data,$delKey) { $newArray = array(); if(is_array($data)) { foreach($data as $key => $value) { if($key !== $delKey) { $newArray[$key] = $value; } } }else { $newArray = $data; } return $newArray; } $data = array('apple','address','ChinaGuangZhou'); $result = array_remove($data, 'name'); $result1 = array_remove1($data, 'name'); print_r($result); print_r($result1);
-
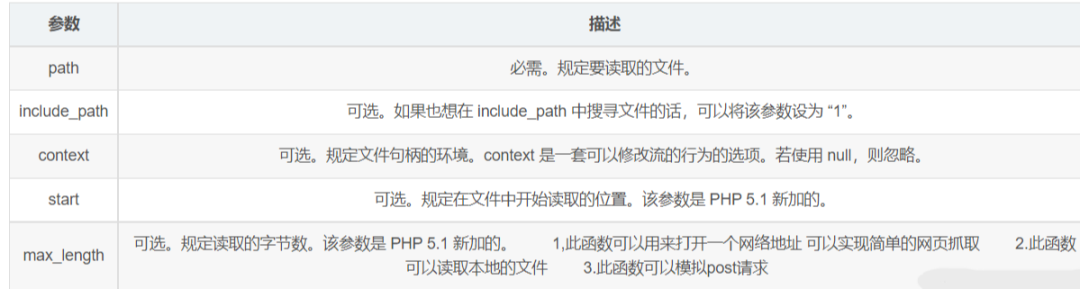
【PHP】PHP实现网络请求的方法及函数总结 一、分析php发送网网络请求的方法对于php发送网络请求,我们最常用的请求就是curl,有时我们也会用到file_get_contents函数发送网络请求,但file_get_contents只能完成一些间单的网络请求,稍复杂的就无法完成,例如文件上传,cookies,验证,表单提交等,用php的curl可以使用URL的语法模拟浏览器来传输数据,因为它是模拟浏览器,因此它同样支持多种协议,FTP, FTPS, HTTP, HTTPS, GOPHER, TELNET, DICT, FILE 以及 LDAP等协议都可以很好的支持,包括一些:HTTPS认证,HTTP POST方法,HTTP PUT方法,FTP上传,keyberos认证,HTTP上传,代理服务器,cookies,用户名/密码认证,下载文件断点续传,上传文件断点续传,http代理服务器管道,甚至它还支持IPv6,scoket5代理服务器,通过http代理服务器上传文件到FTP服务器等等,所以我们在开发中尽量用curl发网络请求,无论是简单还是复杂二、file_get_contents发送网络请求示例file_get_contents(path,include_path,context,start,max_length)一般用file_get_contents或者fopen, file , readfile等函数读取url的时候 会创建一个$http_response_header变量保存HTTP响应的报头,使用fopen等函数打开的数据流信息可以用stream_get_meta_data获取$html = file_get_contents('http://www.baidu.com'); print_r($http_response_header); $fp = fopen('http://www.baidu.com', 'r'); print_r(stream_get_meta_data($fp)); fclose($fp);摸拟post请求:$url = 'http://192.168.1.1/test.php'; $data = array( 'keyword' => 'test data', ); $content = http_build_query($data); $content_length = strlen($content); $options = array( 'http' => array( 'method' => 'POST', 'header' => "Content-type: application/x-www-form-urlencoded\r\n" . "Content-length: $content_length\r\n", 'content' => $content ) ); echo file_get_contents($url, false, stream_context_create($options));三、php 用curl发送网络请求curl可以支持https认证、http post、ftp上传、代理、cookies、简单口令认证等等功能,使用前需要先在你的PHP环境中安装和启用curl模块,这里有两种写法供大家参考:<?php function geturl($url){ $headerArray =array("Content-type:application/json;","Accept:application/json"); $ch = curl_init(); curl_setopt($ch, CURLOPT_URL, $url); curl_setopt($ch, CURLOPT_SSL_VERIFYPEER, FALSE); curl_setopt($ch, CURLOPT_SSL_VERIFYHOST, FALSE); curl_setopt($ch, CURLOPT_RETURNTRANSFER, 1); curl_setopt($ch,CURLOPT_HTTPHEADER,$headerArray); $output = curl_exec($ch); curl_close($ch); $output = json_decode($output,true); return $output; } function posturl($url,$data){ $data = json_encode($data); $headerArray =array("Content-type:application/json;charset='utf-8'","Accept:application/json"); $curl = curl_init(); curl_setopt($curl, CURLOPT_URL, $url); curl_setopt($curl, CURLOPT_SSL_VERIFYPEER, FALSE); curl_setopt($curl, CURLOPT_SSL_VERIFYHOST,FALSE); curl_setopt($curl, CURLOPT_POST, 1); curl_setopt($curl, CURLOPT_POSTFIELDS, $data); curl_setopt($curl,CURLOPT_HTTPHEADER,$headerArray); curl_setopt($curl, CURLOPT_RETURNTRANSFER, 1); $output = curl_exec($curl); curl_close($curl); return json_decode($output,true); } function puturl($url,$data){ $data = json_encode($data); $ch = curl_init(); //初始化CURL句柄 curl_setopt($ch, CURLOPT_URL, $url); //设置请求的URL curl_setopt ($ch, CURLOPT_HTTPHEADER, array('Content-type:application/json')); curl_setopt($ch, CURLOPT_RETURNTRANSFER,1); //设为TRUE把curl_exec()结果转化为字串,而不是直接输出 curl_setopt($ch, CURLOPT_CUSTOMREQUEST,"PUT"); //设置请求方式 curl_setopt($ch, CURLOPT_POSTFIELDS, $data);//设置提交的字符串 $output = curl_exec($ch); curl_close($ch); return json_decode($output,true); } function delurl($url,$data){ $data = json_encode($data); $ch = curl_init(); curl_setopt ($ch,CURLOPT_URL,$put_url); curl_setopt ($ch, CURLOPT_HTTPHEADER, array('Content-type:application/json')); curl_setopt ($ch, CURLOPT_RETURNTRANSFER, 1); curl_setopt ($ch, CURLOPT_CUSTOMREQUEST, "DELETE"); curl_setopt($ch, CURLOPT_POSTFIELDS,$data); $output = curl_exec($ch); curl_close($ch); $output = json_decode($output,true); } function patchurl($url,$data){ $data = json_encode($data); $ch = curl_init(); curl_setopt ($ch,CURLOPT_URL,$url); curl_setopt ($ch, CURLOPT_HTTPHEADER, array('Content-type:application/json')); curl_setopt ($ch, CURLOPT_RETURNTRANSFER, 1); curl_setopt ($ch, CURLOPT_CUSTOMREQUEST, "PATCH"); curl_setopt($ch, CURLOPT_POSTFIELDS,$data); //20170611修改接口,用/id的方式传递,直接写在url中了 $output = curl_exec($ch); curl_close($ch); $output = json_decode($output); return $output; } ?>一个函数片时各种请求:function sendCurl($url, $data = null,$method='POST') { $method=strtoupper($method); $start_wdmcurl_time = microtime(true); $header = array(' application/x-www-form-urlencoded'); $ch = curl_init(); curl_setopt($ch, CURLOPT_URL, $url); curl_setopt($ch, CURLOPT_FAILONERROR, false); // https 请求 if (strlen($url) > 5 && strtolower(substr($url, 0, 5)) == "https") { curl_setopt($ch, CURLOPT_SSL_VERIFYPEER, false); curl_setopt($ch, CURLOPT_SSL_VERIFYHOST, false); } if($method=='GET'){ if($data && is_array($data) && count($data)>0 ){ $url.="?".http_build_query($data); } curl_setopt($ch, CURLOPT_URL, $url); }elseif($method=='POST'){ curl_setopt($ch, CURLOPT_POST, 1); curl_setopt($ch, CURLOPT_POSTFIELDS, $data); if (is_array($data) && count($data)>0) { curl_setopt($ch, CURLOPT_POST, true); $isPostMultipart = false; foreach ($data as $k => $v) { if ('@' == substr($v, 0, 1)) { $isPostMultipart = true; break; } } unset($k, $v); if ($isPostMultipart) { curl_setopt($ch, CURLOPT_POSTFIELDS, $data); } else { curl_setopt($ch, CURLOPT_POSTFIELDS, http_build_query($data)); } } }elseif(in_array($method,['PUT','DELETE','PATCH'])){ curl_setopt($ch, CURLOPT_CUSTOMREQUEST,$method); curl_setopt($ch, CURLOPT_POSTFIELDS, $data); } curl_setopt($ch, CURLOPT_RETURNTRANSFER, 1); curl_setopt($ch,CURLOPT_HTTPHEADER,$header); $reponse = curl_exec($ch); curl_close($ch); return $reponse; }四、使用php composer的扩展guzzlehttpcomposer require guzzlehttp/guzzle $client = new \GuzzleHttp\Client(); $response = $client->request('GET', 'https://api.github.com/repos/guzzle/guzzle'); echo $response->getStatusCode(); // 200 echo $response->getHeaderLine('content-type'); // 'application/json; charset=utf8' echo $response->getBody(); // '{"id": 1420053, "name": "guzzle", ...}' // Send an asynchronous request. $request = new \GuzzleHttp\Psr7\Request('GET', 'http://httpbin.org'); $promise = $client->sendAsync($request)->then(function ($response) { echo 'I completed! ' . $response->getBody(); }); $promise->wait();日常开发中我们尽量用方法三,自定义用curl处理网络请求,或用composer的guzzlehttp扩展库,有起来也很方便。学习地址:https://mp.weixin.qq.com/s/MOQyelYTv_UYYx9dqIOVRw
-
【PHP】ThinkPHP6 公共 上传到本地的方法 附带使用方法 <?php namespace app\common\lib\files; use think\Exception; use think\exception\ValidateException; class upload { private $domain; protected $name; protected $type; protected $module; protected $image; public function __construct($name = '',$type = 'image',$image = []) { $this->name = $name; $this->type = $this->checkUpload($type); $this->module = request()->app_name(); $this->image = $image; $this->domain = Request()->domain(); } protected $config = [ 'image' => [ 'validate' => [ 'size' => 10*1024*1024, 'ext' => 'jpg,png,gif,jpeg', ], 'path' => '/images', ], 'audio' => [ 'validate' => [ 'size' => 100*1024*1024, 'ext' => 'mp3,wav,cd,ogg,wma,asf,rm,real,ape,midi', ], 'path' => '/audios', ], 'video' => [ 'validate' => [ 'size' => 100*1024*1024, 'ext' => 'mp4,avi,rmvb,rm,mpg,mpeg,wmv,mkv,flv', ], 'path' => '/videos', ], 'file' => [ 'validate' => [ 'size' => 5*1024*1024, 'ext' => 'doc,docx,xls,xlsx,pdf,ppt,txt,rar,zip,pem,p12', ], 'path' => '/files', ], ]; private function checkUpload($type){ try{ if(empty($_FILES) || empty($_FILES[$this->name])) throw new Exception("未上传文件!"); if(!in_array($type,array_keys($this->config))) throw new Exception("文件类型不存在!"); return $type; }catch (Exception $e){ return \app\common\controller\Base::show(100,$e->getMessage()); } } public function upfile($infoSwitch = false){ $file = request()->file($this->name); try{ if($file == null) throw new ValidateException("the file cannot be empty"); validate(['file' => self::validateFile()])->check(['file' => $file]); $savename = \think\facade\Filesystem::disk('public')->putFile( $this->module.$this->config[$this->type]['path'], $file); if($infoSwitch){ return self::getFileInfo($file,$savename); } return $savename; }catch (\think\exception\ValidateException $e){ return \app\common\controller\Base::show(100,self::languageChange($e->getMessage())); } } private function validateFile(){ if(empty($this->image)){ $validataType = [ 'fileSize' => $this->config[$this->type]['validate']['size'], 'fileExt' => $this->config[$this->type]['validate']['ext'], ]; }else{ if(is_array($this->image)) throw new ValidateException(""); $validataType = [ 'fileSize' => $this->config[$this->type]['validate']['size'], 'fileExt' => $this->config[$this->type]['validate']['ext'], 'image' => $this->image //示例值 [200,200] ]; } return $validataType; } private function languageChange($msg){ $data = [ 'the file cannot be empty' => '文件不能为空!', 'unknown upload error' => '未知上传错误!', 'file write error' => '文件写入失败!', 'upload temp dir not found' => '找不到临时文件夹!', 'no file to uploaded' => '没有文件被上传!', 'only the portion of file is uploaded' => '文件只有部分被上传!', 'upload File size exceeds the maximum value' => '上传文件大小超过了最大值!', 'upload write error' => '文件上传保存错误!', ]; return $data[$msg] ?? $msg; } private function getFileInfo($file,$savename){ $info = [ 'path' => config('filesystem.disks.public.url').'/'.str_replace('\\','/',$savename), 'url' => $this->domain.config('filesystem.disks.public.url').'/'.str_replace('\\','/',$savename), 'size' => $file->getSize(), 'name' => $file->getOriginalName(), 'mime' => $file->getMime(), 'ext' => $file->extension() ]; return $info; } } > 使用方法 : > > $instanceUpload = new upload($fileName,$fileType); > $info = $instanceUpload->upfile(true);
-
【PHP】PHP快速读取大文件指定行的方法 1、面临问题分析读取普通小文件我们一般用fopen 或者 file_get_contents就很方便简单 ,前者可以循环读取,后者可以一次性读取,但都是将文件内容一次性加载来操作。如果加载的文件特别大时,如几百M、上G时,这时性能贫瘠就非常突出了,那么PHP里有没有对大文件的处理函数或者类呢? 答案是:有的。2、SplFileObject类高效解决大文件读取问题从 PHP 5.1.0 开始,SPL 库增加了 SplFileObject 与 SplFileInfo 两个标准的文件操作类。从字面意思理解看,可以看出 SplFileObject 要比 SplFileInfo 更为强大。不错,SplFileInfo 仅用于获取文件的一些属性信息,如文件大小、文件访问时间、文件修改时间、后缀名等值,而 SplFileObject 是继承 SplFileInfo 这些功能并新增很多文件处理类操作方法的一个文件操作类。 /** 返回文件从X行到Y行的内容(支持php5、php4) * @param string $filename 文件名 * @param int $startLine 开始的行数 * @param int $endLine 结束的行数 * @return string */ function getFileLines($filename, $startLine = 1, $endLine=50, $method='rb') { $content = array(); $count = $endLine - $startLine; // 判断php版本(因为要用到SplFileObject,PHP>=5.1.0) if(version_compare(PHP_VERSION, '5.1.0', '>=')){ $fp = new SplFileObject($filename, $method); $fp->seek($startLine-1);// 转到第N行, seek方法参数从0开始计数 for($i = 0; $i <= $count; ++$i) { $content[]=$fp->current();// current()获取当前行内容 $fp->next();// 下一行 } }else{//PHP<5.1 $fp = fopen($filename, $method); if(!$fp) return 'error:can not read file'; for ($i=1;$i<$startLine;++$i) {// 跳过前$startLine行 fgets($fp); } for($i;$i<=$endLine;++$i){ $content[]=fgets($fp);// 读取文件行内容 } fclose($fp); } return array_filter($content); // array_filter过滤:false,null,'' }Ps:(1)、上面都没加”读取到末尾的判断”:!$fp->eof() 或者 !feof($fp),结果实践加上这个判断影响效率,而且这里加上也完全没必要。(2)、从上面的函数和实践操作就可以看出来使用SplFileObject类比下面的fgets函数效率要高很多,特别是文件行数非常多、并且要取越后面的内容的时候。fgets要两个循环才可以。
-
【PHP】PHP读取文件指定行的内容 function getLine($file, $line, $length = 40960){ $returnTxt = null; // 初始化返回 $i = 1; // 行数 $handle = @fopen($file, "r"); if ($handle) { while (!feof($handle)) { $buffer = fgets($handle, $length); if($line == $i) $returnTxt = $buffer; $i++; } fclose($handle); } return $returnTxt; }
-
【PHP】ThinkPHP 5.1公共上传类 <?php namespace app\extra; /* * To change this license header, choose License Headers in Project Properties. * To change this template file, choose Tools | Templates * and open the template in the editor. */ //适配移动设备图片上传 use think\Exception; use think\facade\Request; class ExtraUpload{ /** * 默认上传配置 * @var array */ private $config = [ 'image' => [ 'validate' => [ 'size' => 10*1024*1024, 'ext' => 'jpg,png,gif,jpeg', ], 'rootPath' => './Uploads/images/', //保存根路径 ], 'audio' => [ 'validate' => [ 'size' => 100*1024*1024, 'ext' => 'mp3,wav,cd,ogg,wma,asf,rm,real,ape,midi', ], 'rootPath' => './Uploads/audios/', //保存根路径 ], 'video' => [ 'validate' => [ 'size' => 100*1024*1024, 'ext' => 'mp4,avi,rmvb,rm,mpg,mpeg,wmv,mkv,flv', ], 'rootPath' => './Uploads/videos/', //保存根路径 ], 'file' => [ 'validate' => [ 'size' => 5*1024*1024, 'ext' => 'doc,docx,xls,xlsx,pdf,ppt,txt,rar', ], 'rootPath' => './Uploads/files/', //保存根路径 ], ]; private $domain; function __construct() { //获取当前域名 $this->domain = Request::instance()->domain(); } public function upload($fileName){ if(empty($_FILES) || empty($_FILES[$fileName])){ // return ''; returnResponse(100,'文件为空'); } try{ $file = request()->file($fileName); if (is_array($file)){ $path = []; foreach ($file as $item){ $path[] = $this->save($item); } } else { $path = $this->save($file); } return $path; } catch (\Exception $e){ $arr = [ 'status' => 0, 'message' => $e->getMessage(), ]; header('Content-Type: application/json; charset=UTF-8'); exit(json_encode($arr)); } } public function uploadDetail($fileName){ if(empty($_FILES) || empty($_FILES[$fileName])){ // return []; returnResponse(100,'文件为空'); } try{ $file = request()->file($fileName); if (is_array($file)){ $path = []; foreach ($file as $item){ $detail = $item->getInfo(); $returnData['name'] = $detail['name']; $returnData['type'] = $detail['type']; $returnData['size'] = $detail['size']; $returnData['filePath'] = $this->save($item); $returnData['fullPath'] = $this->domain.$returnData['filePath']; $path[] = $returnData; } } else { $detail = $file->getInfo(); $returnData['name'] = $detail['name']; $returnData['type'] = $detail['type']; $returnData['size'] = $detail['size']; $returnData['filePath'] = $this->save($file); $returnData['fullPath'] = $this->domain.$returnData['filePath']; $path = $returnData; } return $path; } catch (\Exception $e){ $arr = [ 'status' => 0, 'message' => $e->getMessage(), ]; header('Content-Type: application/json; charset=UTF-8'); exit(json_encode($arr)); } } private function getConfig($file){ $name = pathinfo($file['name']); $end = $name['extension']; foreach ($this->config as $key=>$item){ if ($item['validate']['ext'] && strpos($item['validate']['ext'], $end) !== false){ return $this->config[$key]; } } return null; } private function save(&$file){ $config = $this->getConfig($file->getInfo()); if (empty($config)){ throw new Exception('上传文件类型不被允许!'); } // 移动到框架应用根目录/uploads/ 目录下 if ($config['validate']) { $file->validate($config['validate']); $result = $file->move($config['rootPath']); } else { $result = $file->move($config['rootPath']); } if($result){ $path = $config['rootPath']; if (strstr($path,'.') !== false){ $path = str_replace('.', '', $path); } return $path.$result->getSaveName(); }else{ // 上传失败获取错误信息 throw new Exception($file->getError()); } } } 使用方法: $p = new \app\extra\ExtraUpload(); return $p->uploadDetail('file');